Education
Never Stop Learning
Got questions about Classcipe? We've got answers! Check out this frequently asked questions page to learn everything you need to know about our innovative teaching and learning function.
A. Unit plan
Q1. How do I create a unit plan on the Classcipe platform?
Ans. W
hen you ha
ve logged into
www.classcipe.com
, your landing page shows ‘My content’
i
n your personal account. There is an option titled ‘Create new
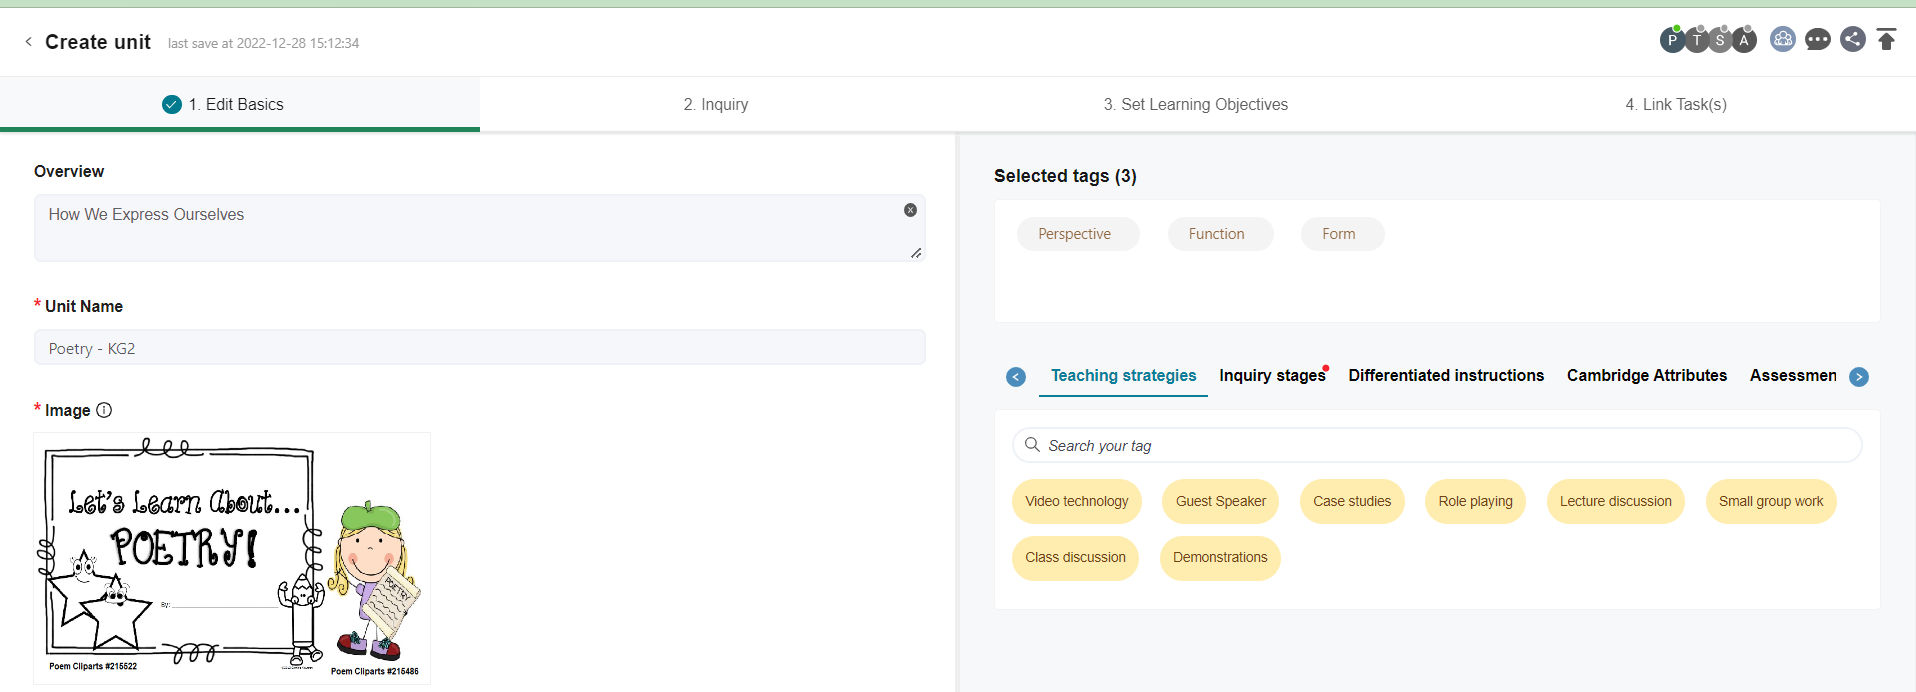
’. Select ‘Unit plan’ from the drop down menu. There are four separate tabs/sections at the top, 1. Edit basics, 2. Inquiry, 3. Set learning objectives and 4. Link Tasks.
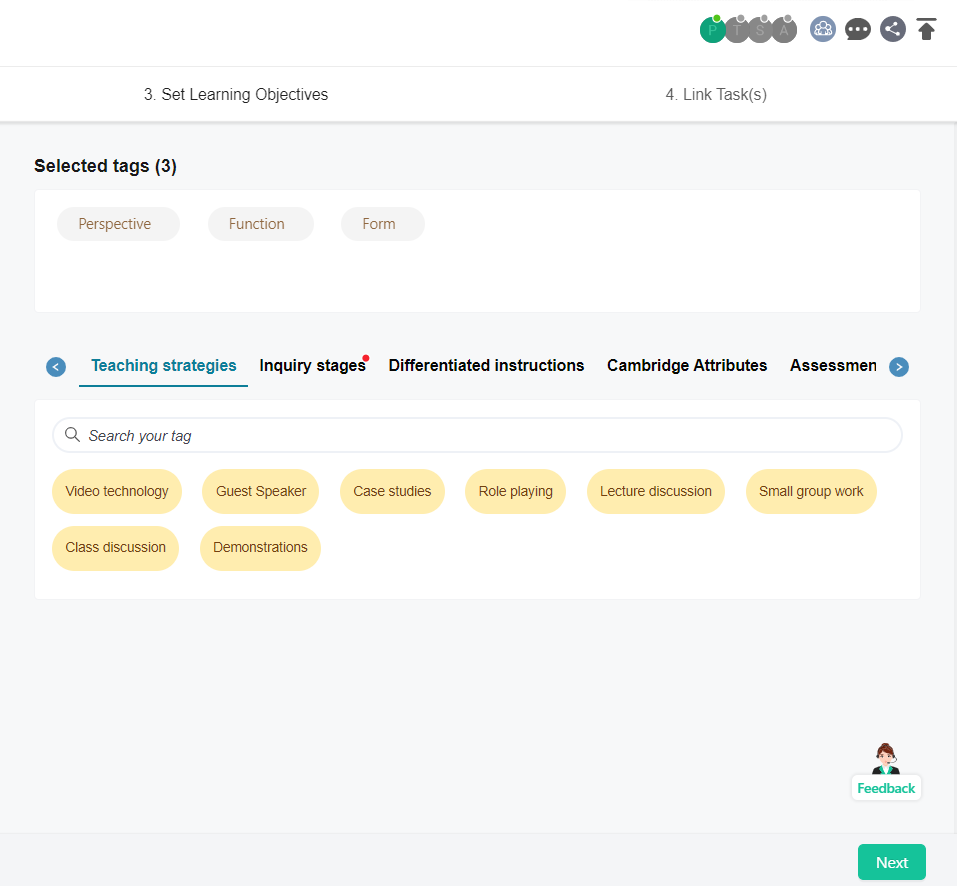
Start entering data from the first tab/ section, Edit basics. Please note that *(asterisk) indicates mandatory fields. On the right there are different categories and you can select the relevant tags to add to your unit plan.
Next, you enter the data for the second tab/ section titled ‘Inquiry’. Here, you put in the inquiry parts of your unit; like the Big Idea/ Statement of Inquiry/ Central Idea, relevant UN-SDG, Real world connections (select from dropdown), Key questions/ Lines of Inquiry.
After that, you go to the next tab/ section titled ‘Set Learning Objectives’. On the left of the screen is the assessment objectives (Standard) and to the right is the content (Topic). Select your curriculum first and then go to ‘Subject setting’ to choose your subject and its related strands.
Finally, you go to the tab/ section titled ‘Link Tasks’. This is where you create your ‘Tasks’. Tasks are nothing but detailed lesson plans/ learning engagements wherein you put down how you will be delivering the content/ learning to your learners. (Please refer to FAQs - Tasks for details)
In the ‘Link Tasks’ section you may add a category; select from existing list viz. Kath Murdoch Inquiry Cycle, 5Es or create your own category.
watch video
Q2. How can I customise my own unit plan template?
Ans. If you are using a personal account on www.classcipe.com, click on your profile at the right and from the Dropdown Menu select the ‘Account’. Scroll down to ‘Setting’ - ‘Planning format’ to customise your own unit plan from here. You can add sections or disable certain sections to create your very own unit planner.
There are embedded unit plan templates to choose from as well.
Q3. If I have a school account on Classcipe as well as my personal account, will the unit plan format appear the same?
Ans. The unit plan template for your school account is set by your school administrator. You can’t customise it. However, for your personal account you can customise your unit plan format or choose from the embedded unit plan templates. (Refer Q2. answer for navigation)
Q4. If I am creating a unit plan using my school account and publishing it, who all will be able to view that? Where can the published unit plans be viewed?
Ans.
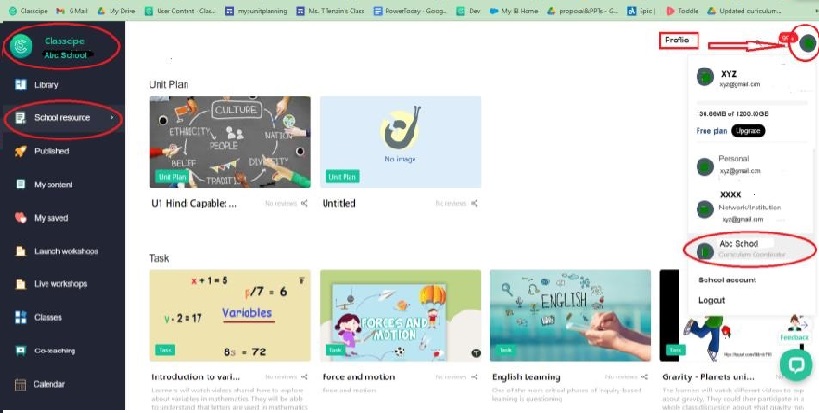
The resources created using your school account, if published, will be available for viewing only to colleagues at your school as it is a closed environment.
This will appear under the ‘School resource’ Tab when you access your school from the drop down menu when you click on your profile at the right. See image below for reference
Q5. If I have a co-teacher, how can I share my unit plan with her on the Classcipe platform?
Ans. You can invite your co-teacher as a collaborator to co-design the unit on the Classcipe platform. Click on the ‘collaborate’ icon on the top right corner while creating/ editing your unit plan. Just type in your co-teacher’s email address to invite her to collaborate with you and co-design the unit plan.
Learn More
B. Task/ Sub-tasks (Activities)
Q1. How do I create a lesson plan on the Classcipe platform?
Ans. The term used for lesson plans in Classcipe is ‘Task’. When you have logged into www.classcipe.com, your landing page shows ‘My content’ in your personal account. There is an option titled ‘Create new’. Select ‘Task’ from the drop down menu to create a lesson plan.
The task is divided into five sections/ tabs; 1. Edit basics, 2. Set Learning Objectives, 3. Add Assessment tool, 4. Edit Slides and 5. Link unit. Start entering data from left to right. You can navigate between the sections by clicking at the top or using the next green button at the bottom right corner.
In the first section/ tab ‘Edit basics’ you have to enter the title of your task, upload a cover image, put in the task details, select the type of task, select the key questions/ lines of inquiry (these will be from the list you have entered while creating the unit plan) or create new key questions relevant to your task. Next, add the tags to your task by selecting the relevant ones from the different tag categories on the right. Your selected tags will appear to the right of your screen.
Proceed further to the second section/ tab ‘Set Learning Objectives’. Here you will find the assessment objectives (Standard) on the left of your screen and the content (Topic) to the right. Select your curriculum first and then go to ‘Subject setting’ to choose your subject and its related strands. The content (Topic) to the right is mandatory for all types of tasks. The assessment objectives (Standard) will be added in case your task is either a formative assessment task (FA), Summative assessment task (SA) or Internal assessment task (IA).
Next, you will move on to the most important part i.e. the third section/ tab ‘Edit Slides’. When you click on the Edit google slides button, the system will automatically open a google slide presentation. This slide presentation will by default have the same title as that of your task. Create your task as a google slide presentation. You can make this interactive using the Google Classcipe Add-on. Once your presentation is complete click on the Update and go to Classcipe green button on the right. On clicking this, you will be back to where you were working on your task.
You will then move to the final section/ tab ‘Link Unit’. You can link this task to your unit by just clicking and dragging. Select the relevant unit from the right and use the click and drag method to link the unit to this task. You can link a task to multiple units. Finally, click on ‘complete’ green button to the bottom right to finish creating your task.
watch video
Q2. How do I create tasks in my existing unit plan?
Ans.
You can edit your existing unit plan to add tasks directly under it. The steps to follow for it is; login to www.classcipe.com, your landing page will be ‘My content’ and yo
ur screen will show all the resources that you have created, select your unit, click on edit, then go to the section titled ‘Link T
asks’. Next click on 'Add new task' to create a new task under this unit.
Q3. How do I link task to a unit plan?
Ans.
You can link task to an existing unit plan in two ways. your existing unit plan to add tasks directly under it. The steps to follow for it is; login to www.classcipe.com, your landing page will be ‘My content’ and yo
ur screen will show all the resources that you have created, select your unit, click on edit, then go to the section titled ‘Link T
asks’. Next, click and drag a task, to link it to this unit. Alternatively, you can select your task and click on edit. After that go the last option 'Link unit' and click on the button 'Link content'. A pop-up window will open, which shows all your units under 'My content'. Next select a unit to link by clicking on the 'Add link' button. thus, your task gets linked to a unit plan.
watch video
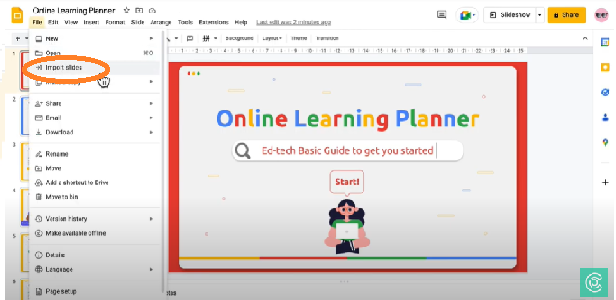
Q4. While creating my task slides, can I use my existing slide data? If yes, how do I do it?
Ans. Yes, you can. Open the existing task created by you and go to 'Edit Slides' option. Click on 'File' - 'Import slides'. You can select your particular Google slide presentation from your drive and import the required information from there to your task slides.
Watch video
C. Add-on tool
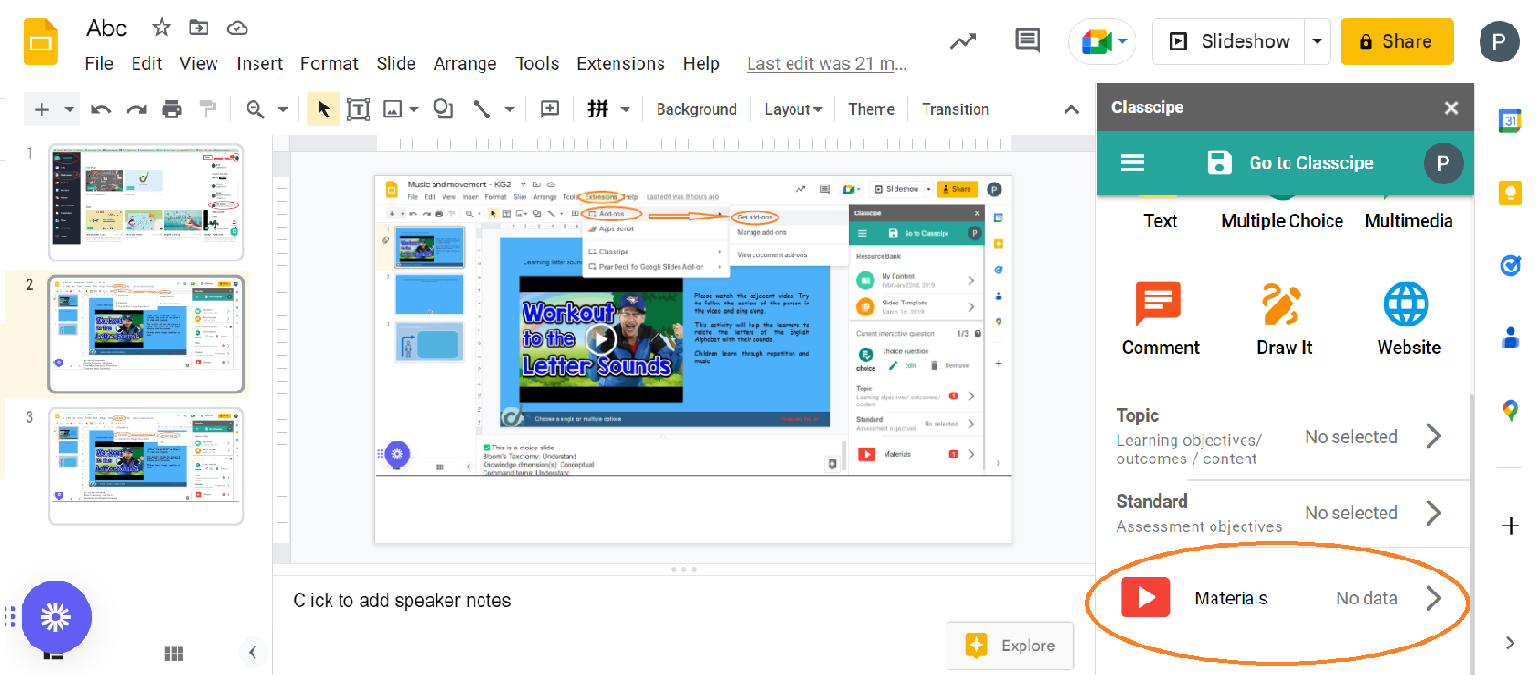
Q1. How can I get/ launch the Classcipe add-on tool?
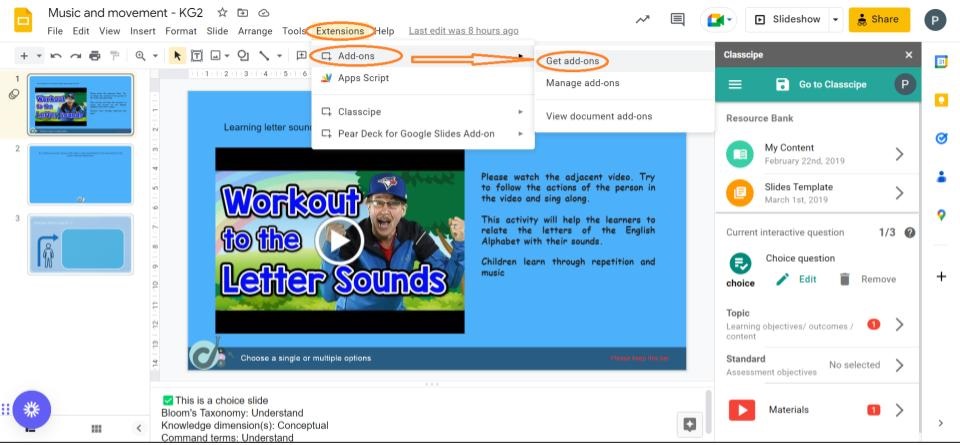
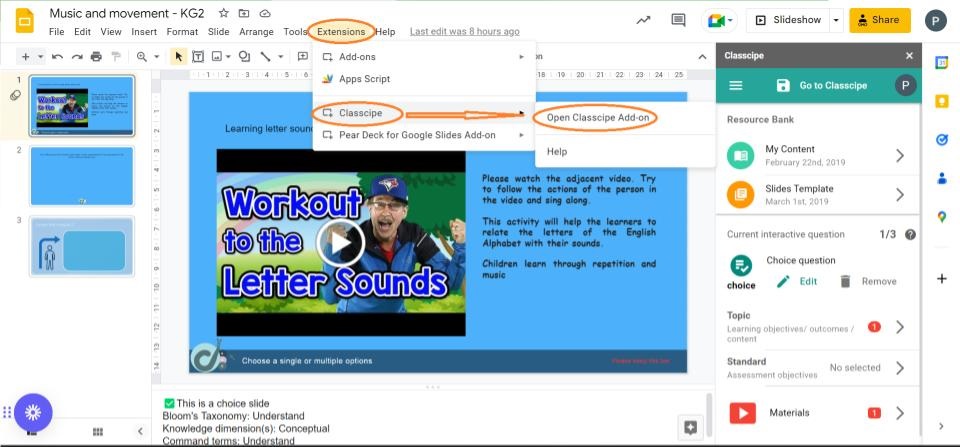
Ans. Open a google slide presentation. Click on the ‘Extensions’ menu and select ’Add-ons’ - ‘Get add-ons’. Enter ‘Classcipe’ in the search bar. Install the add-on tool after granting access to Classcipe. Once, the Clascipe add-on tool is installed successfully. The same can be opened using the navigation → ‘Extensions’ - ‘Classcipe’ - ‘Open Classcipe Add-on’. The Add-on tool opens on your right side of the screen.
Image 2
Image 1
 Watch video
Q2. How do I add materials to my slides?
Ans.
The resources such as videos, images can be added to your Google slides using the Classcipe add-on tool feature 'Materials'.
The videos and images could be added directly from the web, from your device and also from YouTube.
Watch video
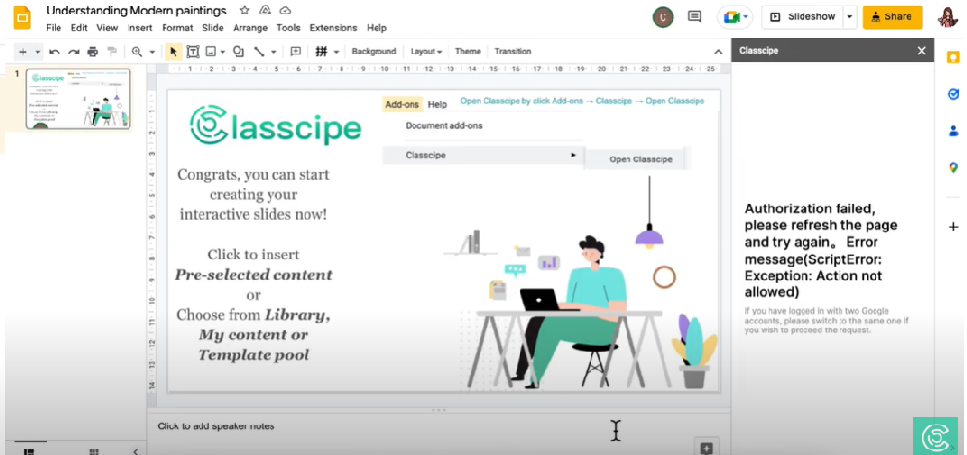
Q3. The add-on tool is showing an error while loading and I am unable to access it. Can someone guide me?
Ans.
Classcipe works best with Google Chrome browser. Please confirm that your Chrome profile is the same as your email address being used to create your interactive Google slide.
watch video
Q4. How does the add-on interactive questions look like in the classroom environment?
Ans. There are six types of interactive questions available to make your lesson engaging for your learners and enable you to monitor how the learning is happening in an ongoing manner. The same can we viewed by clicking on the button below.
watch video
This email address is being protected from spambots. You need JavaScript enabled to view it.